")

TL;DR:
- Continuous lighting has become an accessible, beginner-friendly alternative to strobes, offering real-time feedback on shadows and highlights. Proper control of distance, power, and modifiers shapes soft, flattering portraits, making it ideal for learning light without guesswork. While less powerful outdoors, continuous lights excel in studio settings for those developing their eye for light and working with video.
If you’ve been avoiding continuous light for portrait photography because you assumed strobes were the only “serious” option, you’re not alone. Most beginners default to flash because that’s what they see professionals using. But continuous lights have quietly become one of the most accessible, beginner-friendly tools in the portrait photographer’s kit. This guide breaks down how they work, which types are worth your money, and how to use them to create portraits you’re genuinely proud of.
Table of Contents
- Key takeaways
- Continuous light for portrait photography: types and features
- Shaping light with modifiers, distance, and position
- Continuous lights vs. flash: honest pros and cons
- Practical shooting tips with continuous lighting
- Building an affordable continuous lighting kit
- My honest take on continuous lights for portraits
- Take your portrait work further with Jodiblodgettphotography
- FAQ
Key takeaways
| Point | Details |
|---|---|
| Real-time light feedback | Continuous lights show you exactly how shadows and highlights fall before you press the shutter. |
| Power affects setup size | Match your light’s wattage to your space: 60 to 80W for small studios, 200W+ for larger or brighter environments. |
| Distance shapes light quality | Moving your light closer softens it; moving it farther away hardens it and slows light falloff. |
| Budget entry points are low | Solid beginner continuous LED kits start around $99, making them far more accessible than strobe setups. |
| White balance is your creative lever | Coordinating color temperature with camera white balance lets you recreate warm golden hour tones indoors. |
Continuous light for portrait photography: types and features
Not all continuous lights are built the same, and picking the wrong type for your setup leads to frustration fast. The good news is that once you understand the basic categories, the decision gets a lot clearer.
Power ratings and room size
Lights rated 60 to 80W work well for small studio portraits where your subject is close and ambient light is controlled. Step up to 100 to 150W for medium setups or rooms with more windows, and go 200W or higher if you’re shooting in bright conditions or need to overpower daylight. Choosing the wrong power level is one of the most common beginner mistakes. A 60W light that looks great at night becomes nearly invisible in a sunlit living room.
LED, COB, and panel lights
Bi-color LED panels let you dial color temperature anywhere from about 2700K to 6500K, giving you warm tungsten tones or cool daylight in the same fixture. COB (chip-on-board) LEDs produce a more focused, punch-forward beam and work exceptionally well with modifiers like softboxes and beauty dishes. Flat panel lights spread light over a larger area naturally, making them popular for hybrid photo and video workflows where you need even, flattering illumination without harsh shadows.
Color accuracy and skin tones
CRI (color rendering index) and TLCI (television lighting consistency index) measure how accurately a light reproduces colors. For portraits, aim for a CRI of 95 or above. Lights with lower CRI ratings can make skin tones look sallow or muddy, and no amount of post-processing fully fixes that.
Pro Tip: Look for lights that list both CRI and TLCI scores. A high CRI alone doesn’t guarantee great skin tones on camera. TLCI is specifically calibrated for how sensors capture light, so it’s often the more useful number for photographers.
Price tiers reflect these quality differences. Entry-level LED units start around $99, mid-range options land around $190 to $220, and professional-grade fixtures can exceed $14,999. For most aspiring portrait photographers, a solid mid-range bi-color LED with a Bowens mount gives you plenty of room to grow. Features like wireless app control and bi-color tuning are no longer reserved for expensive gear. The Godox SL60IIBi is a widely recommended example in this category.
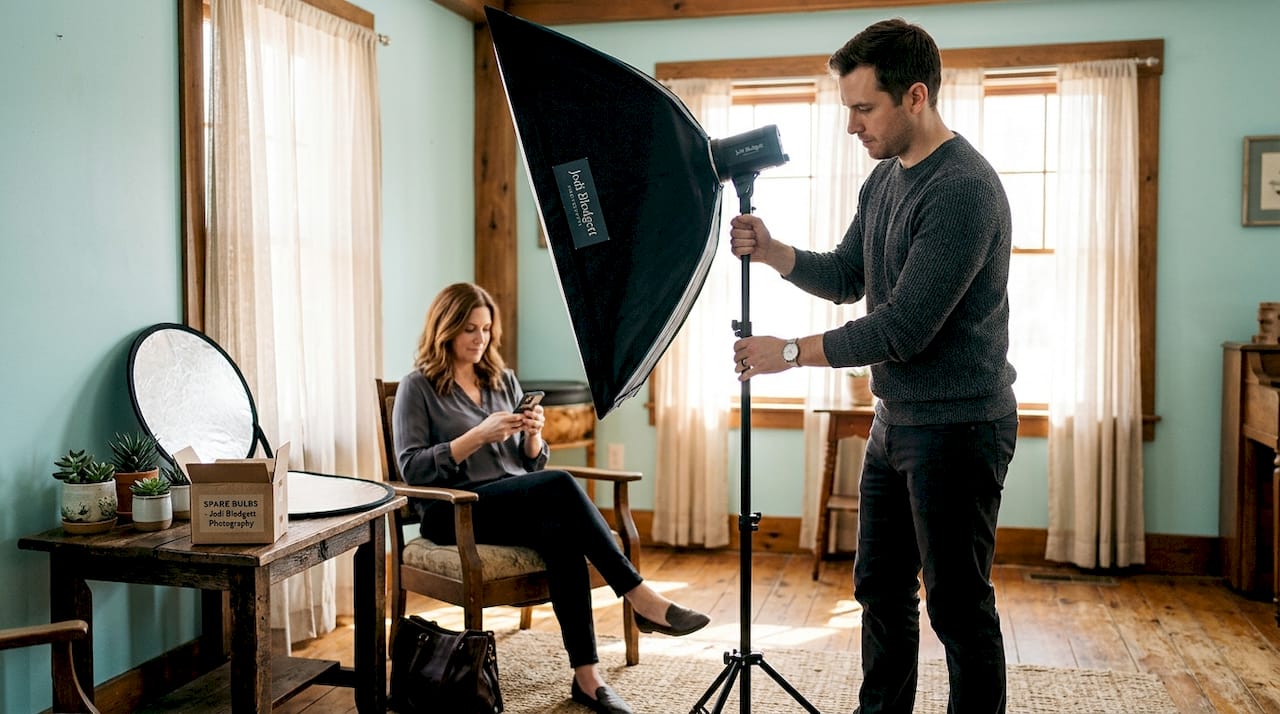
Shaping light with modifiers, distance, and position
Here’s where most photographers waste money. They buy a softbox, expect soft light automatically, and get confused when results look harsh. The truth is that the modifier itself is almost secondary.
Why distance matters more than you think
Light softness depends on source size relative to your subject, not just what’s attached to the light. A large softbox pulled far from your subject produces hard, unflattering light. That same softbox moved in close wraps light around your subject’s face beautifully. Moving your light closer softens the quality and increases falloff so the background goes darker faster. Moving it farther away hardens the quality and creates more even exposure across the scene.
Common modifiers and what they actually do
- Softbox: Large surface area creates diffused, even light. Pull it close for maximum softness. Works great for headshots and family portraits.
- Umbrella: Affordable and easy to set up. Shoot-through umbrellas spread light wide; reflective umbrellas concentrate it slightly more. Less control over spill than a softbox.
- Beauty dish: Creates a distinctive quality between hard and soft. Produces crisp catchlights and mild shadows. Popular for fashion-influenced portrait work.
- Grid: Attaches to softboxes or beauty dishes to narrow the spread of light and reduce spill. Useful when you want to control exactly where light falls.
Pro Tip: Before your portrait session, place a simple white coffee mug on your subject’s chair and study how the light falls on it. The mug’s curves reveal shadow direction, highlight placement, and hotspots far more clearly than guessing with a hand test.
For portrait photography lighting techniques, the position of your light relative to the camera-subject axis changes everything. A light placed directly in front of the subject at camera height creates flat lighting with almost no shadows. As you move it horizontally to the side and slightly upward, you build dimension. Past 90 degrees, you’re creating split lighting with strong mood and drama. Height matters too. Raising the light above eye level creates downward shadows that slim and define facial features. Dropping it below eye level produces unnatural shadows that feel unsettling in most portrait contexts.
Continuous lights vs. flash: honest pros and cons
The WYSIWYG (what you see is what you get) workflow is the single biggest advantage continuous lights offer over flash. You see the shadows, highlights, and catchlights in your subject’s eyes in real time. There’s no guessing, no reviewing test shots, no Polaroid-style trial and error. For someone learning to read light, this feedback loop is worth more than almost any other feature.
That said, continuous lights have real limitations.
- Power ceiling: Even high-end continuous LEDs struggle to overpower bright outdoor sunlight. Flash wins this battle decisively.
- Heat: Some continuous lights generate significant heat over long sessions, which matters in tight spaces or when working with children and newborns. Modern LEDs run cooler than tungsten options, but heat is still a factor.
- Motion freezing: Flash fires at durations as fast as 1/1000s or shorter. Continuous lights rely entirely on your shutter speed to freeze motion, which means you need adequate light volume to keep ISO low while shooting at faster shutter speeds.
- Battery/outdoor use: Continuous lights typically require AC power. Portable battery-powered options exist but add cost and often sacrifice output.
Continuous lights are where you learn to see light. Flash is where you go when you need to fight ambient light outdoors.
Flash remains the stronger choice for outdoor portraiture, action, and high-volume event work. But for studio portraits, beginners building their eye for light, and photographers who also shoot video, continuous lights offer real advantages. Many lifestyle photography and brand portrait workflows now rely on continuous LEDs precisely because they serve both mediums without requiring a second lighting system.
Practical shooting tips with continuous lighting
Getting technically clean portraits under continuous light means adjusting how you think about your camera settings. Unlike flash, your shutter speed directly affects exposure.
- Start with ISO 100 and open your aperture first. Aperture controls depth of field and determines how much light reaches the sensor. Start at f/1.8 or f/2 for single-subject headshots, or f/5.6 if you need a group in focus.
- Set shutter speed to control ambient light. A home studio setting around 1/400s at f/1.4 and ISO 100 can effectively eliminate ambient light from a small room, letting your continuous light become the dominant source.
- Adjust ISO last. If your image is too dark after maximizing aperture and dropping shutter speed, raise ISO. Most modern cameras handle ISO 800 and even ISO 1600 well enough for portrait work.
- Use your white balance creatively. To recreate a warm indoor golden hour effect, set your light to 2700K and your camera white balance to around 4500K. The mismatch creates a warm, organic glow that looks nothing like flat studio light.
- Practice the five portrait lighting patterns. Horizontal positioning relative to the camera-subject axis gives you flat, Rembrandt, loop, split, and butterfly lighting. Practice each one in a single session and you’ll internalize light behavior faster than any tutorial can teach.
Pro Tip: Shoot the same subject in the same spot using each major lighting pattern back to back. Then compare the images side by side. The visual difference is more instructive than any diagram, and you’ll remember it longer.
Building an affordable continuous lighting kit

Starting out doesn’t require a massive investment. Most photographers build their kit in stages, and that’s the smartest approach.
Budget tiers at a glance
| Tier | Budget range | What you get |
|---|---|---|
| Beginner | Under $150 | Single bi-color LED panel, basic light stand, shoot-through umbrella |
| Mid-range | $200 to $500 | Two-light LED kit, softbox, quality stands, Bowens-compatible mounts |
| Intermediate | $500 to $1,000 | COB LED with full modifier system, reflector, background stand and paper |
What to prioritize when buying
- A Bowens mount on the light head gives you access to a wide ecosystem of affordable modifiers. Proprietary mounts lock you into one brand’s accessories.
- Bi-color temperature control is worth paying for. It gives you far more creative flexibility than a fixed daylight-only unit.
- Quality light stands matter more than most beginners expect. A cheap stand that tips over is a safety hazard and a gear killer.
For those considering lighting for newborn photography, the same principles apply but prioritize lower-heat LEDs and dimming control so you can work at comfortable brightness without disturbing a sleeping subject.
When shopping for affordable continuous light kits, test gear at a local camera store if possible. Output claims on packaging vary wildly, and seeing a light in action tells you more than any spec sheet.
My honest take on continuous lights for portraits
I’ll be straightforward with you. When I first started paying attention to light, flash intimidated me. The modeling light gave me a rough preview, but the actual exposure always felt like a guess until I reviewed the shot. Continuous lights changed that experience completely. Watching shadows shift in real time as I moved the light around my subject was how I finally understood what “soft” and “hard” light actually meant in practice, not just in theory.
What surprised me most was how much I could accomplish with one well-placed continuous LED and a single softbox. Simple setups reveal everything about your understanding of light. When something looks wrong, there’s nowhere to hide. That’s actually a gift for anyone learning.
My honest advice: stop obsessing over gear and spend that energy moving your light around. The best photographers I know could make a single budget LED panel look stunning because they understand distance, angle, and what modifiers are actually doing. A $14,000 fixture in the hands of someone who doesn’t understand source size and distance will still produce mediocre portraits. A $150 LED in skilled hands can look remarkable.
Continuous light keeps you honest. Use that.
— Andrew
Take your portrait work further with Jodiblodgettphotography
If this guide has you thinking harder about how light shapes your portraits, you’re already ahead of most beginners. Jodiblodgettphotography works with clients across Massachusetts, Connecticut, and Rhode Island to create portraits where light, posing, and emotion all come together. Whether you’re curious about what engagement photography involves or looking to see professional lighting and posing in action, the Jodiblodgettphotography portfolio shows exactly what intentional light looks like in real sessions. Explore engagement picture tips for a closer look at how lighting choices translate into genuine, memorable images.

Browsing the galleries and reading through the session guides on Jodiblodgettphotography is one of the fastest ways to train your eye for what good portrait light actually looks like in finished work.
FAQ
What is continuous light in portrait photography?
Continuous light is any light source that stays on constantly during a shoot, unlike flash which fires in a brief burst. This allows photographers to see lighting effects in real time before capturing the image.
What are the benefits of continuous lighting in photography?
The biggest benefit is the real-time visual feedback it provides. You can see exactly how shadows, highlights, and catchlights look on your subject before pressing the shutter, which accelerates learning and reduces wasted shots.
How do I use continuous light to get soft, flattering portraits?
Move your light source closer to your subject to increase softness and wrap light around facial features. A large softbox placed close creates the most flattering, even illumination for portrait work.
Are continuous lights good for beginners?
Continuous lights are widely considered the best starting point for portrait photographers learning to read light. The WYSIWYG workflow removes guesswork and makes the connection between light placement and portrait quality immediately visible.
What camera settings work best with continuous lights?
Start at ISO 100, open your aperture to f/1.8 or f/2 for single subjects, and use shutter speed to control how much ambient light enters the frame. Raising ISO is the last adjustment to make when you need more exposure.